Showing posts with label sewing project. Show all posts

Monday, September 13, 2010

One of a Kind Lunch Bag for a One of a Kind Girl


I was so excited when my little girl asked me to make her a lunch bag for Kindergarten  instead of buying a Hello Kitty one! Of course I had a little help tipping the scales to the handmade side thanks to Danita.  I asked Danita if I could have one of  her images printed on a piece of fabric, and she happily supplied me.  My daughter just learned to ride a bike and I thought the little girl on the bike would be just perfect.  Then I came across this wonderful tutorial about how to make a fabric lunch sack from A Lemon Squeezy Home.   I spent sometime designing it with my daughter and here is the final product!
I used a cloth dishtowel for the main fabric

My kids got me a set of handmade owl buttons from  beadfreaky for my Mother's Day gift - I thought this would be a good place to use one!

Saturday, September 4, 2010

Fabric Acorn Tutorial

I thought it would be fun to create some fabric acorns made with real acorn hats.  So, we headed out on a family hike to gather some nuts like little squirrels.  After we got home, we carefully pulled the tops off the acorns and I played around with some fabrics until I got the acorn-look I wanted.   Here's a quick little nature-inspired craft tutorial on how to make fabric acorns.  I had fun making these, and I couldn't make just one,  my kids had fun helping  me collect and choose fabrics, and my husband just thinks I'm nuts!  
colorful fabric acorns 
supplies needed

 cut out a circle with 2.25 inch diameter
 snip the circle 4 times
just up to the center

fold the circle in half and sew a seam for each section you just cut - be sure to back stitch
(you will sew 4 seams)

when you are done sewing the 4 seams it will look like a cone - this is the bottom of the acorn
sew a running stitch about a quarter inch from the top of the bottom of the acorn

leave a little bit of a tail at the start of the running stitch

(i usually use a matching thread, i used black here to illustrate this step)
after you sewed all the way around the cone you should have two tails, the start and the end of the thread


pull the ends of the thread together so the cone closes up a little bit


stuff the acorn bottom with a little bit of stuff 'n fluff
(do not entirely close the cone once it is stuffed- it will fill the acorn hat better if it is not pulled all the way)

     put hot glue into an acorn hat


    quickly press your acorn bottom to the hat and squeeze the two together

    and there you have it - a quick, fun, and festive craft
    Right now my acorns are being used as Nutkin's snack.  But I think they would make a very cute brooch or look fun in a bowl as a decoration for Autumn.  I am thinking of stringing a few and making an acorn garland.  I would love to see your nutty creations!


    Tuesday, August 24, 2010

    Owl Wall Art - Baby Name Sign


    I finally got around to making something for my little one. Her older sister helped me choose the fabric for the little owls. It is from Heather Ross's Mendocino line - great taste, right? I also made Hazel her own little owl. Here's a photo of the crazy baby hanging out in her crib.


    I had been wanting to make Hazel her own owl mobile for awhile because every time I make one she gets so excited looking at it. I had fun personalizing the tiny little owls just for her - plus this way she will get to keep it! She may never get a quilt, but she will have baby owls spelling her name. Ok, maybe ONE DAY she will get a quilt.

    Wednesday, August 11, 2010

    Back to School Time


    It's back to school time. For the first time in six years I am going to have to wake up to an alarm! My daughter is going to be going off to Kindergarden. She is very concerned about every detail concerning. . . her lunch. I told her I would make her a little coin purse for her milk money - oddly enough she choose a fabric with owls on it!


    One thing Etsy introduced me to was imported Japanese fabric! So CUTE! I order a bunch of the little prints for snack bags, and I am going to use some of the smaller pieces for these little milk money purses... I will be listing some new ones in my shop soon.

    Wednesday, May 12, 2010

    Fabric Cards Full of Love.


    I opened up an Etsy shop because I love to create - I get on crafting kicks where I make several of whatever it is I am working on at the time: dream catchers, totes, art dolls, pajamas, memory quilts, necklaces, snack bags... these creations pile up. My family can only handle so many of my handmade one of a kind pieces of art work! But then once I did open up my shop, had orders to work on found I didn't have time to make those matching doll outfits for my daughter, stamp out a quick card , or create a special art doll for someone I was thinking about. This year for Mother's Day I finally got back at it - creating something for someone I loved. Here is the fabric card I made for my mom- as you can see, I am still excited about the Japanese fabric. Oh, and I also made her a set of pot holders.

    Wednesday, April 28, 2010

    A little more Fabric Art please.


    So, I have been trying to push myself to create more fabric art, which is what I love to do. Don't get me wrong, I love sewing in general - aprons, snack bags, zipper pouches. But I feel like so much more goes into one of my "wall - hangings". I even made up a crafty little fabric house last week - photos to come. This blue with an orange heart art quilt has been "in-progress" for about 2 years. I just never took the time to complete it until this week. It's on sale now in my Etsy shop. I made 5 of the heart background blocks at once and I am slowly figuring out what thoughts to put on them, and how to embellish them. So now I still have a pink one to make - gotta think of the words for it...

    Monday, February 23, 2009

    Creating a Reversible Fabric Headband - Zemphira Style

    You Will Need:
    • 2 pieces of fabric that measure 19 inches by 3 inches
    • 5 inches of elastic
    • template and tracing utensil, safety pin
    • iron, sewing machine, thread, scissors, & and chopstick
    Step 1- Choose your fabric.  I tend to use two fabrics 
    that somewhat coordinate. Cut a 19x 3 inch rectangle from each fabric.


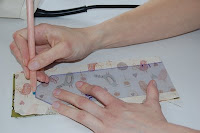
    Step 2 - Put the two fabrics right sides together, and then fold them in half. Place the end of the template on the fold and then trace. Cut out the pieces on the line.


    Step 3- Sew the two pieces of fabric together leaving the ENDS open as well as a 2 inch hole along one side. (sew 1/4 inch away from the edge)


    Step 4 - Attach a safety pin to one end of the elastic and thread it through one end of the headband.  Do not pull it all the way through, stop with a little bit of elastic hanging out of the end.  Then sew down that end of the elastic - I backstitch over the elastic a few times.  Then pull the elastic out the other end and sew it down.  (right now the headband will be scrunched up and inside out)

    Step 5- Turn the headband right-side 
    out through the 2-inch hold you left on one of the long sides.  Use a chopstick to push out the corners and along the seams.  Iron the headband flat.


    Step 6 - Top - stitch a little less than a 1/4 inch all the way around the headband - make sure you pay extra attention when you are sewing the hole to be sure you close it up.


    Step 7 - Wear your headband, give your headband away, and then create another!