You Will Need:
- 2 pieces of fabric that measure 19 inches by 3 inches
- 5 inches of elastic
- template and tracing utensil, safety pin
- iron, sewing machine, thread, scissors, & and chopstick
Step 1- Choose your fabric. I tend to use two fabrics

that somewhat coordinate. Cut a 19x 3 inch rectangle from each fabric.
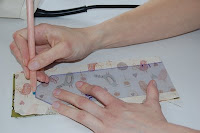
Step 2 - Put the two fabrics right sides together, and then fold them in half. Place the end of the template on the fold and then trace. Cut out the pieces on the line.


Step 3- Sew the two pieces of fabric together leaving the ENDS open as well as a 2 inch hole along one side. (sew 1/4 inch away from the edge)

Step 4 - Attach a safety pin to one end of the elastic and thread it through one end of the headband. Do not pull it all the way through, stop with a little bit of elastic hanging out of the end. Then sew down that end of the elastic - I backstitch over the elastic a few times. Then pull the elastic out the other end and sew it down. (right now the headband will be scrunched up and inside out)
Step 5- Turn the headband right-side


out through the 2-inch hold you left on one of the long sides. Use a chopstick to push out the corners and along the seams. Iron the headband flat.


Step 6 - Top - stitch a little less than a 1/4 inch all the way around the headband - make sure you pay extra attention when you are sewing the hole to be sure you close it up.
Step 7 - Wear your headband, give your headband away, and then create another!


