Showing posts with label zemphira. Show all posts

Monday, August 5, 2013

New Stamps!

I have only worked with 3 artists to create  new stamp images, and each time it has been so much fun.  I get the file ready for the plate to be made, get the plate, and get to pressing!  It' just so exciting to see how the images translate into stamps.  So this time around I worked with Rachel from Tree Talker.  Her images have made wonderful stamps!  Here are the first two cards ever made with the new images.
flowers for hair
I guess the photo isn't the best, but these images turn out amazingly clear and sharp.
Mama and Baby Raccoon
I just love these new images and I can't wait to see what other stampers create with them!  Also, you can visit Rachel's shop where all of her original drawings for the stamps are available.

Sunday, January 29, 2012

Working On New Images for 100 Proof Press

So, I've been trying to catch up after the holidays.  And I must admit blogging if one of the first things  I ignore on my to-do list - a long with cleaning up the craft room.  But, at least I've been a bit productive for the stamp company.  I have been playing around with some new images, trying them out, seeing if they are good enough to include in the catalog.  I have fallen in love with this little owl girl.
I tried to make a Valentine with her.  I just think she's so cute and unique.  Soon I'm going to have to help my little ones make 50 or so Valentines for their classes.  Wonder what images they will choose.  . .

Wednesday, November 30, 2011

Let the advent begin!

Well, my father and I both made our deadlines.  He made the tree, and I got the fabric bins done.  Although I still have to do something about the numbers - so if December 1st is tomorrow, the tree is basically ready - oh wait, it IS tomorrow!   It's not like I've never stayed up late craftin' it out.  So, here is the ALMOST finished Advent Calendar.
One of my goals with this project was to use up some of the cute Christmas fabric I've been holding on to.  It's going to be fun taking this bad boy out every Holiday, and I know my kids will have fun remembering all the fabrics I used - er I mean the goodies they got each morning.
My father claims every cubby space is the same size...

Now it's time to get creative filling the bins!


Ok ok, so I have a few more finishing touches, but I am very excited about this tradition.  My sisters and I had an "advent fairy" stirring up excitement every December, and it's something we'll never forget.

Friday, January 28, 2011

A Fabric Heart Garland

While I was crusin' the web I found this wonderful tutorial for a fabric heart garland over on How About Orange.  As soon as I saw the garland I knew it was just the project for my red Valentine fabric, and naptime.  So I quick-like got some cute fabrics together, cut out some hearts, mixed some water with glue and made this festive decoration.
Cute lil' girlie heart.
This project was very statisfying: it's cute, 
simple, and a productive way to spend
nap time (right?).  I did not have
any fabric stiffener on hand so I mixed
glue and water, and it seemed to work fine.
I also think this project would be fun with
paper too.
Hearts on the table.


Me, *patiently* waiting for the hearts to dry.

My sister got me this fabric, so cute!

The hearts strung.  I think it would have been cute to string them together using baker's twine.  Alas, I had none.
I am still in shock that I actually made something with the red fabric, BEFORE February.  I might need to make more hearts. . . 

Tuesday, January 4, 2011

Valentine Owls

I'll owl-ways be yours, say you'll owl-ways be mine... so many fun Owlentine puns.  What's your favorite?
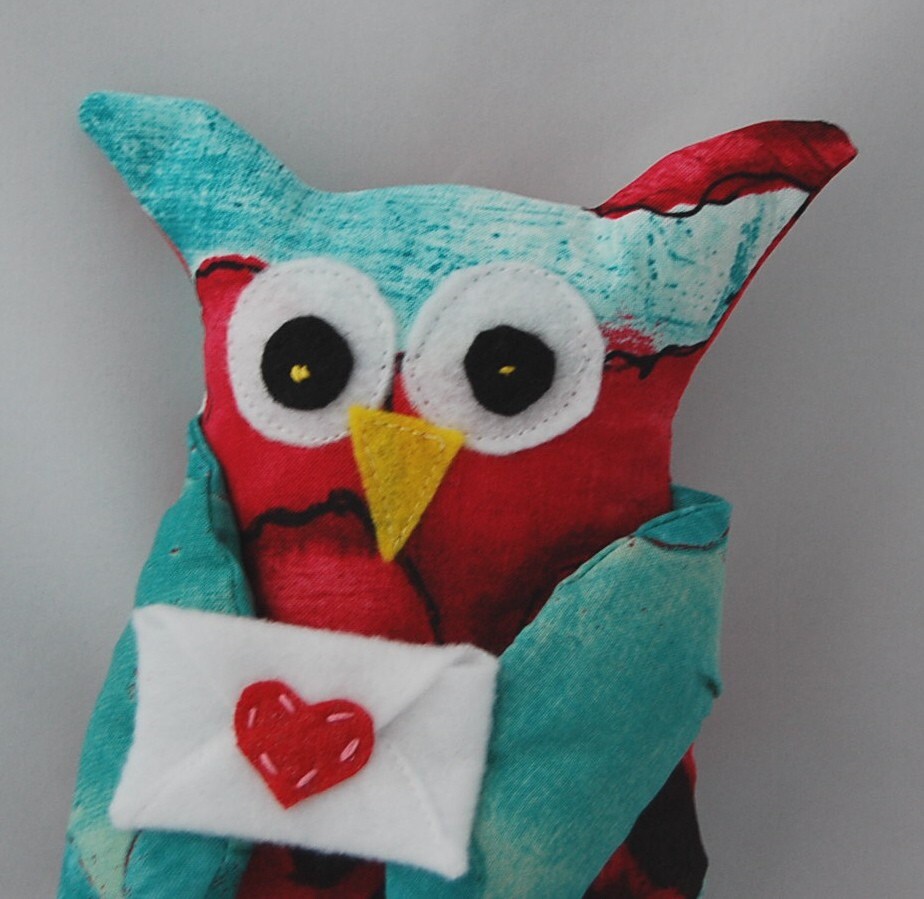
Hoot hoot!
My goal was to get 5 Valentine owls in my shop  by January 2nd, and I almost did it.  I tried to get away from the classic pink and red thing I usually do for Valentine's Day.  This guy is my favorite.  I have a few others in my shop right now, and I'm going to try to sew up a few more - if I have time!

Monday, September 13, 2010

One of a Kind Lunch Bag for a One of a Kind Girl


I was so excited when my little girl asked me to make her a lunch bag for Kindergarten  instead of buying a Hello Kitty one! Of course I had a little help tipping the scales to the handmade side thanks to Danita.  I asked Danita if I could have one of  her images printed on a piece of fabric, and she happily supplied me.  My daughter just learned to ride a bike and I thought the little girl on the bike would be just perfect.  Then I came across this wonderful tutorial about how to make a fabric lunch sack from A Lemon Squeezy Home.   I spent sometime designing it with my daughter and here is the final product!
I used a cloth dishtowel for the main fabric

My kids got me a set of handmade owl buttons from  beadfreaky for my Mother's Day gift - I thought this would be a good place to use one!

Saturday, September 4, 2010

Fabric Acorn Tutorial

I thought it would be fun to create some fabric acorns made with real acorn hats.  So, we headed out on a family hike to gather some nuts like little squirrels.  After we got home, we carefully pulled the tops off the acorns and I played around with some fabrics until I got the acorn-look I wanted.   Here's a quick little nature-inspired craft tutorial on how to make fabric acorns.  I had fun making these, and I couldn't make just one,  my kids had fun helping  me collect and choose fabrics, and my husband just thinks I'm nuts!  
colorful fabric acorns 
supplies needed

 cut out a circle with 2.25 inch diameter
 snip the circle 4 times
just up to the center

fold the circle in half and sew a seam for each section you just cut - be sure to back stitch
(you will sew 4 seams)

when you are done sewing the 4 seams it will look like a cone - this is the bottom of the acorn
sew a running stitch about a quarter inch from the top of the bottom of the acorn

leave a little bit of a tail at the start of the running stitch

(i usually use a matching thread, i used black here to illustrate this step)
after you sewed all the way around the cone you should have two tails, the start and the end of the thread


pull the ends of the thread together so the cone closes up a little bit


stuff the acorn bottom with a little bit of stuff 'n fluff
(do not entirely close the cone once it is stuffed- it will fill the acorn hat better if it is not pulled all the way)

     put hot glue into an acorn hat


    quickly press your acorn bottom to the hat and squeeze the two together

    and there you have it - a quick, fun, and festive craft
    Right now my acorns are being used as Nutkin's snack.  But I think they would make a very cute brooch or look fun in a bowl as a decoration for Autumn.  I am thinking of stringing a few and making an acorn garland.  I would love to see your nutty creations!


    Friday, August 13, 2010

    Etsy Treasury - Meteor Shower Inspired

    It's mid August and that means it's time for the Perseid Meteor Shower. So, since it was way to hot in the sewing room last night I made an Etsy treasury with an Astronomy theme. I have always been interested in Astronomy and I had a lot of fun looking on Etsy for items to fit this collection. A few owls snuck in there, but they go with the theme!


    Tonight I'll be outside in the back yard looking up - I am hoping for a clear night tonight!

    Wednesday, August 11, 2010

    Back to School Time


    It's back to school time. For the first time in six years I am going to have to wake up to an alarm! My daughter is going to be going off to Kindergarden. She is very concerned about every detail concerning. . . her lunch. I told her I would make her a little coin purse for her milk money - oddly enough she choose a fabric with owls on it!


    One thing Etsy introduced me to was imported Japanese fabric! So CUTE! I order a bunch of the little prints for snack bags, and I am going to use some of the smaller pieces for these little milk money purses... I will be listing some new ones in my shop soon.

    Wednesday, June 30, 2010

    Tiny Fabric Art Quilts


    So after completing my Frida Sardine can altered art piece I was quickly reminded that I am not just a maker of aprons and purses. So I started laying out all of my special fabrics to make an art quilt - then I got distracted by the cute Little Red Riding Hood scrap and needed to turn it into something quickly! I started making these tiny art quilts, then I decided they would make great brooches. And now I can't wait to make more!

    I tried really hard not to make an owl-related item, but a little hoot snuck in! But my favorite is the sewing one. They are on sale in my Etsy shop now.